ReSkin Calibration Instructions
ReSkin Calibration
Step 1: Print Base
ReSkin calibration begins by printing a base for the sensor to constrain its position within the 3D printer’s workspace. This ensures repeatability and eliminates the need to calibrate the sensor's position. A base for the ReSkin can be found in different formats below. If using a standard Ender 3, we recommend directly uploading the G-Code (Ender 3) file to your 3D printer. For those who wish to modify the base or slice it for different 3D printers, we have included STEP/STL files and a link to the Onshape document.
After selecting and loading the necessary files into the 3D printer, print the base.
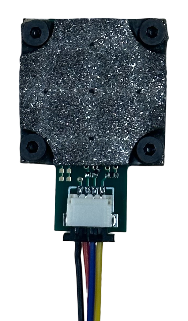
Step 2: Insert Sensor into Base
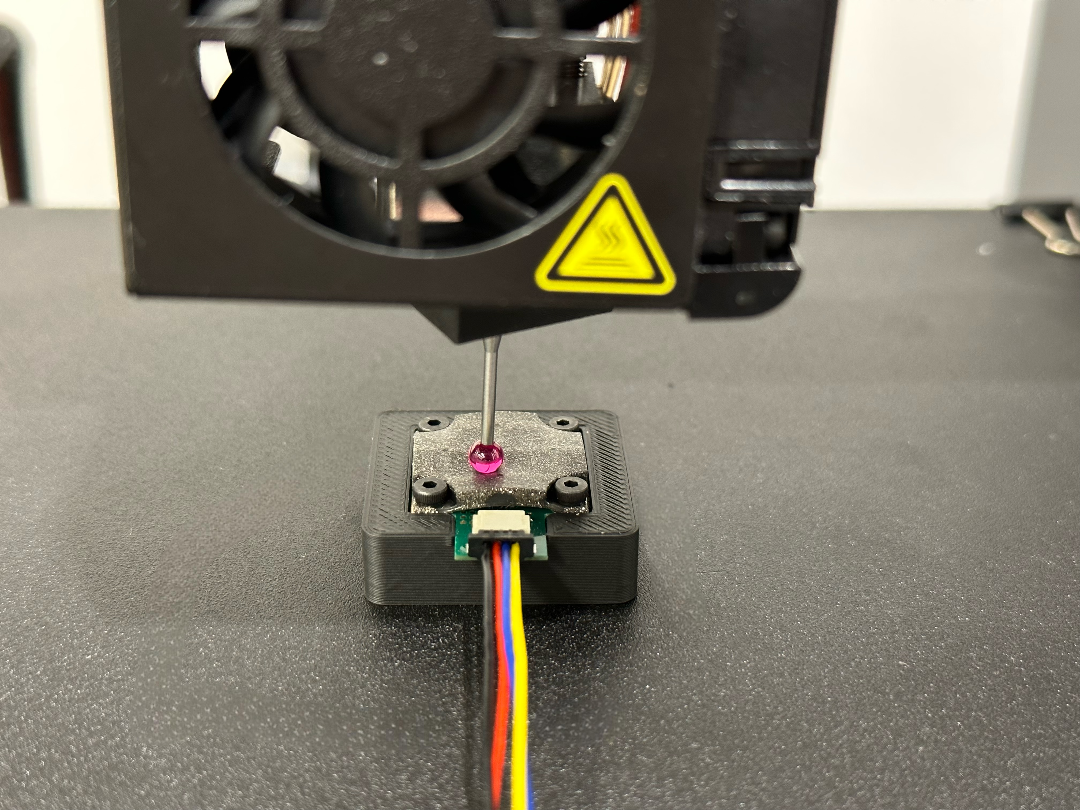
Step 3: Attach Probe to Printhead
Once the base is printed, you can convert your 3D printer into an automated probing device by attaching a probe tip to the printhead. We use a ruby probe tip from McMaster probe (part no. 85175A586), which we attach to the printhead using a 3D printed adapter. The files for the adapter can be found below.
If you wish to use a custom probe tip, you can design a custom adapter. The geometry for attaching to the printhead of the Ender 3 can be found in the drawing and CAD files under the "Custom Probe" tab below.
Step 4: Probe Sensor
The source code for the 3D Cal library can be found here. Below is a guide to get you started.
Initial Setup
To make sure you have all the necessary Python libraries, run the following line in your terminal:
pip3 install py3DCalYou can then import the library in your Python scripts:
import py3DCal as p3dQuick Start
Below is a minimal example of how to use py3DCal to collect probe data.
Note: Replace the /dev/ttyUSB0 and /dev/ttyUSB1 with the respective serial ports for the Ender3 and ReSkin. If you don't know the
name of the ports, they can be printed using p3d.list_com_ports() or by typing list-com-ports in the terminal.
import py3DCal as p3d

ender3 = p3d.Ender3("/dev/ttyUSB0")
reskin = p3d.ReSkin("/dev/ttyUSB1")
calibrator = p3d.Calibrator(printer=ender3, sensor=reskin)
calibrator.probe_reskin()
Additional printer functionality
Connect to the printer
ender3.connect()Homing the printer
ender3.initialize(xy_only=False)Parameters:
xy_only=False(default): Home the XYZ axes of the printer.xy_only=True: Only home the XY axes of the printer.
Moving the printer
ender3.go_to(x=5, y=5, z=2)Parameters:
x(optional): The desired x-coordinate of the print head.y(optional): The desired y-coordinate of the print head.z(optional): The desired z-coordinate of the print head.
Note: Any of the above parameters can be omitted if you don't want to move certain axes.
Sending G-Code (Ender 3) to the printer
ender3.send_gcode(command="G28")Parameters:
command: The G-Code (Ender 3) command to be sent to the printer.
Getting response from the printer
ender3.get_response()Disconnect from printer
ender3.disconnect()Additional sensor functionality
Connect to the sensor
reskin.connect()Taking a reading with the sensor
reskin.capture_image()Disconnect from the sensor
reskin.disconnect()Step 5: Train Model
Quick Start
The following is a minimal example of how to train a MagNet model from scratch using the data collected in Step 4:
import py3DCal as p3d
from py3DCal import datasets, models

# Create the dataset
my_dataset = datasets.ReSkinDataset(root="./sensor_calibration_data", subtract_no_contact=True)

# Create the model
my_model = models.MagNet()

# Train the model
p3d.train_model(model=my_model, dataset=my_dataset, device="cuda")

# Generate depth maps using the trained model
p3d.get_reskin_contact(model=my_model,
  sensor_reading=[Bx0, By0, Bz0, Bx1, By1, Bz1, Bx2, By2, Bz2, Bx3, By3, Bz3, Bx4, By4, Bz4]
)
Parameters for py3DCal.datasets.ReSkinDataset():
root: Root directory of the dataset.subtract_no_contact(optional): Subtracts the average of the no-contact readings from all data points. Default is True.
Parameters for py3DCal.train_model():
model: Atorch.nn.Moduleobject.dataset: Apy3DCal.datasets.ReSkinDatasetobject.num_epochs(optional): The number of epochs to train for. Default is 60.batch_size(optional): The batch size to use for training. Default is 64.learning_rate(optional): The learning rate to use for training. Default is 1e-4.train_ratio(optional): The split ratio for train and test sets. Default is 0.8.loss_fn(optional): The loss function to use for training. Default is nn.MSELoss().device(optional): Compute device to use ("cuda", "mps", "cpu" ). Default is "cpu".
Loading a pre-trained model
To load a pretrained model, set load_pretrained=True when creating the ReSkin model:
import py3DCal as p3d
from py3DCal import models

my_model = models.MagNet(
  load_pretrained=True,
  root="."
)
Parameters:
load_pretrained(optional): Whether to load a pretrained model. Default is Falseroot(optional): Root directory for storing the downloaded pretrained weights (or loading them if they've already been downloaded). Defaults to the current working directory.
About MagNet
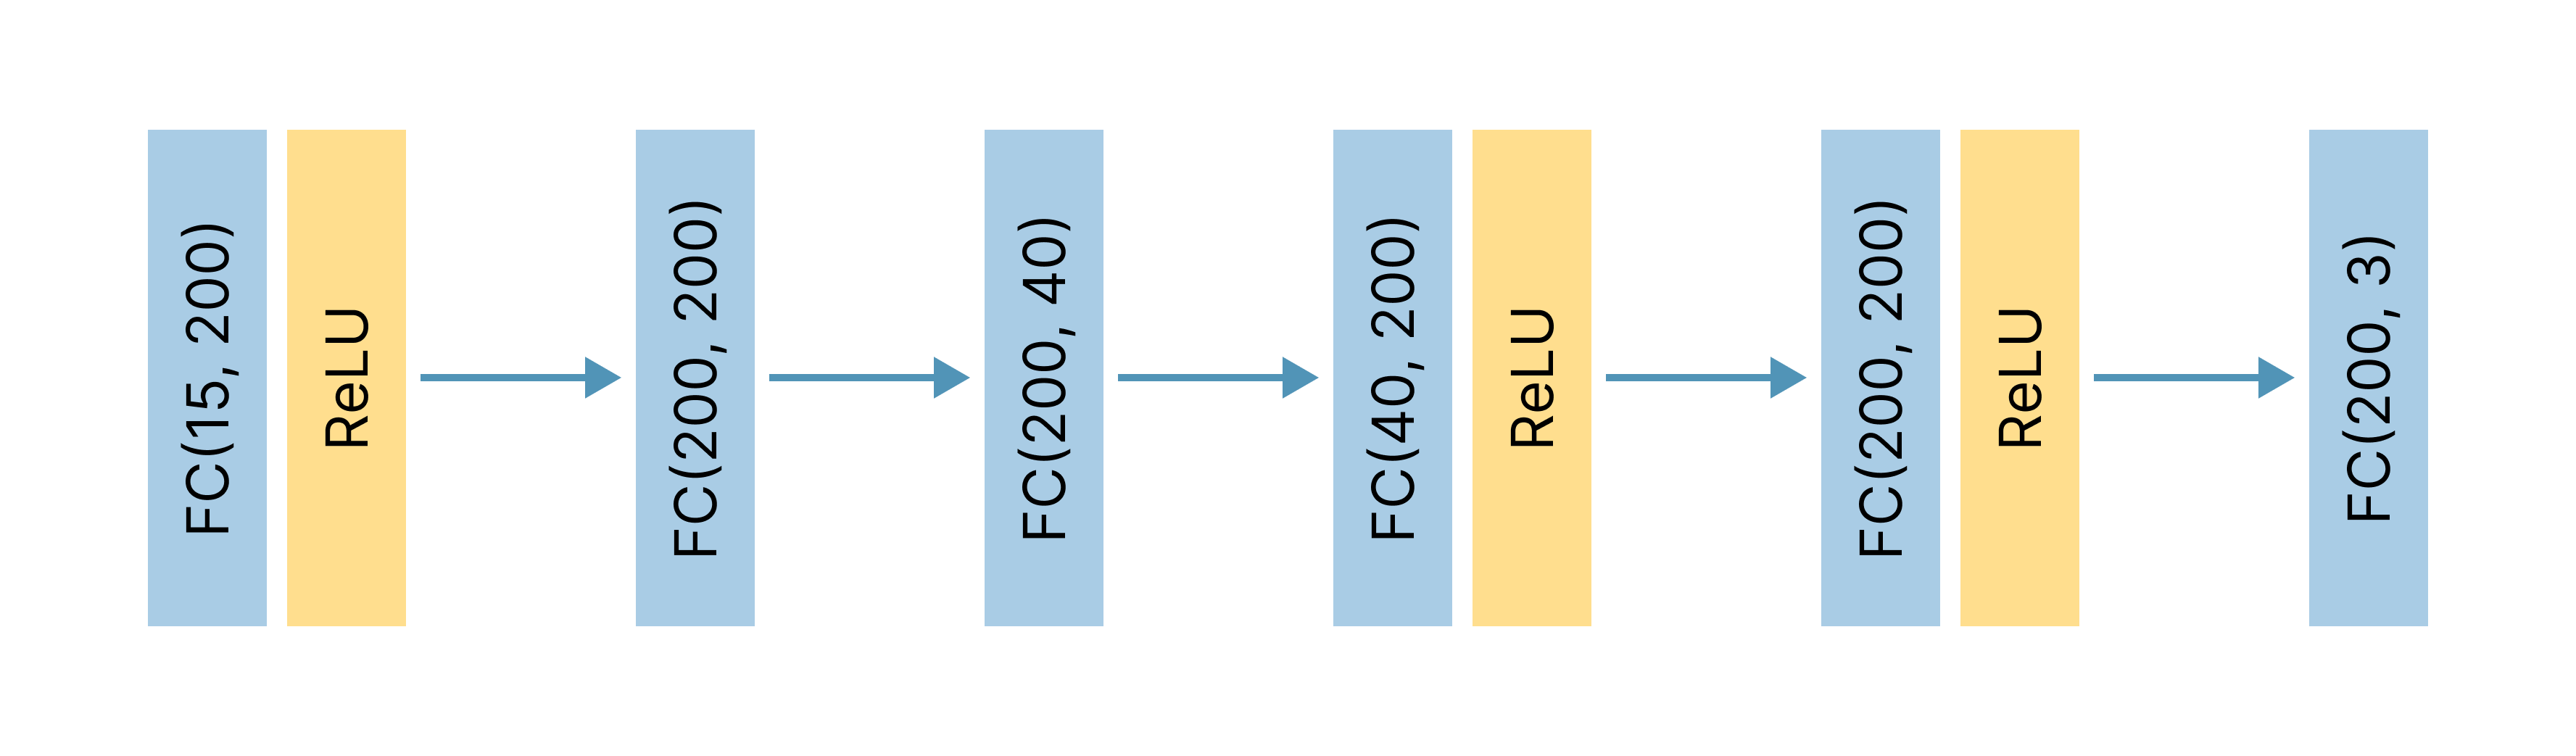
MagNet is a multilayer perceptron neural network designed to predict coordinates of contact forces from magnetic flux readings. Inspired by the model presented in the original ReSkin paper, MagNet takes as input a magnetic flux vector of five separate (Bx, By, Bz) magnetometer readings.
As shown in the figure below, MagNet follows a 6-layer fully connected architecture that expands and contracts the input features twice. After layers 1, 4, and 5, a ReLU activation function is applied. The final output contains the predicted (X, Y) 2D positional coordinates and Z depth.
Step 6: Run Model
Predicting Contact Location
Predicts the contact location on a ReSkin sensor from 5 magnetometer readings. Returns an np.ndarray() of shape (3,):
import py3DCal as p3d

p3d.get_reskin_contact(model=my_model,
  sensor_reading=[Bx0, By0, Bz0, Bx1, By1, Bz1, Bx2, By2, Bz2, Bx3, By3, Bz3, Bx4, By4, Bz4]
)
Parameters:
model(torch.nn.Module): The model to use for contact location prediction.sensor_reading(np.ndarray, torch.tensor, or list): The Bx, By, and Bz values from all 5 magnetometers on the ReSkin sensor.no_contact_reading(optional; np.ndarray, torch.tensor, or list): The Bx, By, and Bz values from all 5 magnetometers on the ReSkin sensor when there is no contact. This parameter should be included if the model was trained on differential readings, unlesssensor_readingitself represents a differential reading.
Open Source Dataset
3D Cal was used to collect thousands of readings from a ReSkin magnetic sensor. In an effort to stimulate the future research and development of tactile sensors, we release our dataset as a part of our open-source library, 3D Cal. This dataset consists of 3,780 readings from 189 distinct probe locations on our ReSkin sensor.